In addition to joyous church services, egg hunts with ornate baskets, and getting your hair bumped with a searing hot comb, something that makes people think of Easter is the food made to honor the occasion. That includes the delectable desserts. Some of us can still taste the cakes and pies made by loved ones, likely by a grandmother, mother or aunt. For chef Maya-Camille Broussard, the flavors created by her family not only bring back great memories, but are what inform her love of making sweet treats today.
“My love of baking comes from making and eating the treats of my parents’ and grandparents’ childhoods,” she tells ESSENCE. “My mother taught me how to make peach cobbler. My great-aunt Ruby taught me the secret to a super moist and light pound cake. My aunt Sandy would always try to bake me whatever I asked for. My dad tried his best to re-create the King Cake we’d have shipped to us each Mardi Gras. Cooking and eating good food were a necessity, but baking was always a luxury and an expression of love in my family.”
Broussard, a Chicago native and James Beard nominee who was one of the stars of Netflix’s Bake Squad, recently released a cookbook called Justice of the Pies, which shares its name with her beloved Chi-town bakery. Both are full of delicious pies, of course, but also quiches and more to satisfy all sorts of tastes. And while her family’s recipes hold a special place in her heart, she finds inspiration for her mouthwatering creations from anywhere.

“I am usually inspired by my travels and by various creative experiences in everyday life,” she says. “I sometimes get ideas from a well-crafted cocktail, a song by Duke Ellington and Billy Strayhorn, or even a pair of Jordan sneakers. I am a visual learner and when I absorb the beauty around me, the ideas pop off like a synapse. Different sensory experiences activate my creative muscles. When I surrender the need to force new ideas, the very best ones come effortlessly.”
In the hopes of inspiring you, we asked Broussard to share some recipes for treats sure to be a hit at dining tables this Easter Sunday, all from her new book. As for her own plans, she’s looking forward to bringing some fruity flavor to the table for this year’s holy holiday.
“My mom has been reminiscing lately about how my grandparents once bought her a birthday cake when she was a young girl. It was a pina colada cake and she closes her eyes and smacks her lips when recalling the pineapple and coconut layers,” Broussard says. “I’ve never experienced a pina colada cake and I have no reference recipe to work from, but I’d like to think that I could create one for her to stir up a bit of sweet nostalgia.”
If it tastes anything like the goodies below will (if you follow the recipe correctly of course), her mom is sure to be pleased. Happy baking — and Easter — to all.

BOURBON PECAN PIE
MAKES ONE 9- INCH PIE
One afternoon, I was selling pies at Renegade Craft Fair when an elderly couple walked up to my table. The husband looked at me over the top of his glasses and sneered, “Just how good is this pecan pie of yours?” I replied with a polite smile, “Well, sir, people tend to rave about it, so I think you might quite like it.” After a few silent moments, he straightened and haughtily announced, “My grandmother made the best pecan pie I’ve ever had. I have never had a pecan pie as good as my grandmother’s pie.” His wife nervously tugged at his elbow and said, “Honey, leave her alone.” He quickly looked at her and loudly said, “No! I’m going to buy a slice of this pie!” and then turned to me and threatened, “It better be good, or I want my money back.”
My mom, who often stopped by if I was working a fair or festival, overheard this exchange. She told him, “Do you see this line that she has? Her pie is GOOD!” and then she turned toward me so that he could not see her face as she rolled her eyes.
I said, “I will not take your money until you’ve had your first bite.” I presented a slice to him and proceeded to help others waiting in a line that was growing longer by the minute.
I was so busy that I forgot about him until my mom pinched my arm and motioned for me to look behind me. I turned around just as the man’s wife said, “Honey? Are you crying?” Her husband’s face was bright red with tears streaming down his cheeks.
“It tastes just like my grandmother’s pie. I almost feel like she is right here with me at this moment.”
He reached out to hand me money for the slice before walking away. When I looked down at my hand, I realized that he had paid double the price for the slice. I can now honestly say that my pecan pie made a grown man cry.
Flour, for rolling out
All-Butter Pie Dough (page 220)
4 large eggs
1 cup (200g) granulated sugar
½ cup (178g) dark corn syrup
2 ounces (57g) bourbon
1 teaspoon pure vanilla extract
½ teaspoon kosher salt
1 tablespoon unbleached all-purpose flour
1½ cups (200g) pecan halves
Adjust an oven rack to the middle position and preheat the oven to 325°F (165°C).
Lightly dust the counter with flour and roll out the pie dough to about 12 inches in diameter. Carefully transfer the dough to a 9-inch pie pan. Roll the overhanging dough to the edge of the pan and crimp. Place the pie shell in the refrigerator to chill for 10 minutes.
In a large bowl, lightly whisk the eggs until they are light and frothy. Add the sugar, corn syrup, bourbon, vanilla, and salt, whisking just until the ingredients come together. Do not overmix. Sift in the flour and fold it into the batter.
Remove the pie shell from the refrigerator and set it on a baking sheet. Line the bottom of the pie shell with the pecans, spreading them evenly. Slowly and constantly pour the batter into the pie shell over the pecans. If you stop while pouring the batter, the pecans will get pushed to the side and your pie filling will have pockets without pecans. Wait a moment to let the pecans rise to the top before transferring to the oven.
Bake the pie until the center slightly jiggles, about 1 hour 5 minutes.
Remove the pie from the oven and allow it to cool for 1 to 2 hours before slicing.
To store the pie, cover with plastic wrap and refrigerate for up to 7 days or freeze for up to 2 months. To thaw, remove the pie from the freezer and allow it to come to room temperature.

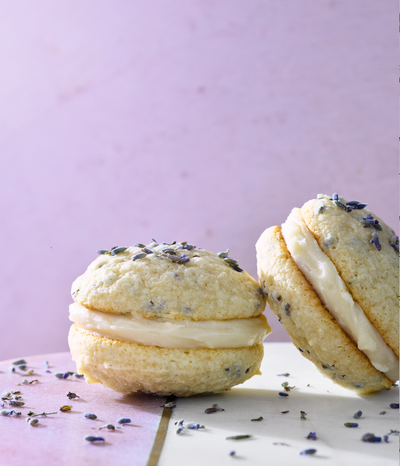
LAVENDER WHOOPIE PIES
MAKES NINE OR TEN 1½- INCH WHOOPIE PIES
I have extremely poor sleeping habits. I generally spend between 14 and 16 hours a day in the kitchen, and I come home exhausted, but often find that I cannot fall asleep. My close friend Asha, a Reiki master and herbalist, suggested that I sleep with a small satchel of dried lavender flowers near my pillow and rub some lavender oil on the soles of my feet before going to sleep.
Her suggestion worked and now I get a much better night’s rest. I shared with her how much I loved lavender and she said, “Why don’t you try baking something with lavender in it?” And here we are! Thanks to Asha for helping birth the idea for these floral whoopie pies. When baking, they fill the room with such a botanical bliss and they are absolute delectation when sandwiched with buttery, sweet cream cheese filling.
WHOOPIE COOKIES
8 tablespoons (1 stick/113g) unsalted butter, at room temperature
1½ cups (300g) granulated sugar
1 large egg, at room temperature
½ cup (126g) buttermilk
1 teaspoon pure vanilla extract
2½ cups (340g) unbleached all-purpose flour
2 tablespoons (3g) dried lavender flowers
1½ teaspoons baking powder
FILLING
4 ounces (113g) cream cheese, at room temperature
4 tablespoons (½ stick; 57g) unsalted butter, at room temperature
1½ cups (176g) confectioners’ sugar
1 teaspoon pure vanilla extract
Pinch of kosher salt
Adjust an oven rack to the middle position and preheat the oven to 350°F (175°C).
MAKE THE WHOOPIE COOKIES: In a large bowl, use a silicone spatula to cream together the butter and granulated sugar until well blended. Add the egg and stir until completely combined. Mix in the buttermilk and vanilla.
In a separate bowl, whisk together the flour, lavender, and baking powder. Add half of the flour mixture to the wet ingredients and use the spatula to fold together. Once well combined, add the remaining flour and blend until just combined. Do not overmix.
Line two baking sheets with parchment paper. Using a 1-ounce cookie scoop or two large spoons, drop 2-tablespoon amounts of batter onto the prepared sheets 1½ inches apart.
Bake the whoopie cookies until they are pale in color and look slightly underbaked, 15 to 17 minutes. The bottoms should be a light golden brown and the edges should remain pale. (If overbaked, they will be hard, rather than fluffy.) Remove from the oven and cool on the pan for about 5 minutes.
MEANWHILE, MAKE THE FILLING: In a large bowl, use a silicone spatula to mix the cream cheese and butter together until well blended. Gradually stir in the confectioners’ sugar until combined. Stir in the vanilla and salt.
Using a small offset spatula or a butter knife, spread about 1½ tablespoons of cream cheese filling on the flat side of one whoopie cookie and sandwich with the flat side of another whoopie cookie. Repeat with the remaining filling and cookies.
The unfilled whoopie cookies can be stored in an airtight container at room temperature for up to 5 days. The filling can be stored in an airtight container in the refrigerator for up to 5 days. Remove the filling from the refrigerator and allow it to come to room temperature before spreading on the whoopie cookies.

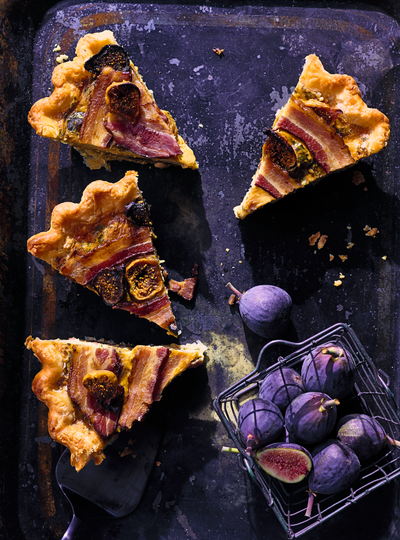
FIG + PIG QUICHE
MAKES ONE 9-INCH QUICHE
This fig quiche, made with dried figs and Parmesan cheese, brings me back to being four or five years old when I was a fanatic for fig cookies. They were the solution to all of my problems. Just tripped and slightly scraped my knee? Comfort me with fig cookies. LeVar Burton sharing books on Reading Rainbow? I had to watch while eating fig cookies. One night, I hid a package under my bed, my plan to retrieve them when the lights were turned off so I could enjoy them in the dark, undisturbed.
No sooner had I stashed my treasure than my bedroom door flung open, my mom standing there, arms crossed, scolding.
“Did you take fig cookies from the kitchen?” I was called out.
“Answer me!” she said.
I slowly shook my head no.
“What’s under the bed then?”
I reached under the bed and pulled out my contraband.
“Didn’t I tell you that you couldn’t have fig cookies?”
If I confessed to knowing that I was not allowed the cookies, I’d lose plausible deniability about what I actually could or couldn’t hear. Enter: the blank stare.
“Go grab the TV and put it in the other room,” she ordered.
I sulked over to the small wardrobe dresser that doubled as a console for our small, 13-inch TV that had a handle on top, and I carried it to the next room.
No explanation was needed. I fully understood that my fig cookie heist cost me the pleasure of watching Saturday morning cartoons.
But you know what? I love figs so much, I’d do it all over again. If your love of figs equals my own, then you will love this quiche. The sweetness of the dried figs offers a nice balance to the saltiness of the bacon.
Flour, for rolling out
All-Butter Pie Dough (page 220)
1 cup dried figs, stemmed and sliced
2 ounces (52g) Parmesan cheese, shaved with a vegetable peeler (about ½ cup)
Our Lady of Quiche Custard (page 100)
10 slices thick-cut bacon (8½ oz/250g)
Adjust an oven rack to the middle position and preheat the oven to 350°F (175°C).
Lightly dust the countertop with flour and roll out the pie dough to about 12 inches in diameter. Carefully transfer the dough to a 9-inch pie pan. Roll the overhanging dough to the edge of the pan and crimp.
Place the figs and Parmesan in the bottom of the pie shell, reserving a few slices of figs for the top of the quiche.
Place the quiche on a baking sheet and slowly pour in the custard.
Carefully transfer the baking sheet to the oven and bake until a light film forms on top of the quiche’s custard, about 15 minutes.
Gently remove the quiche from the oven. Layer the bacon slices and the reserved sliced figs on top of the quiche. Return the baking sheet to the oven and bake until the crust is golden brown and the center is set, 20 to 25 minutes longer.
Remove from the oven and allow to cool slightly. Serve warm or at room temperature.
To store, cover with plastic wrap and refrigerate for up to 7 days. To reheat: Set the rack to the middle position and preheat the oven to 350°F (175°C). Cover slices with aluminum foil and heat until their centers are warm, 20 to 25 minutes.
All-Butter Pie Dough
MAKES ENOUGH FOR 1 SINGLE-CRUST 9- INCH PIE
A good pie dough recipe is imperative if you want to bake a pie (obviously). When you serve a slice of pie to someone, you definitely want them to exclaim, “That crust!” Some bakers are loyal to using lard or shortening, as these fats may seem to offer more flakiness, but I believe that when the dough is handled correctly, an all-butter crust can achieve equal flakiness—plus it offers more flavor!
For this recipe, while you may use a food processor or a stand mixer to make the dough, in my opinion the best way to achieve peak flakiness is to make it by hand. This will lessen the likelihood of the butter and flour being overworked. And with most things made with your hands, practice is the road to a place called perfection.
8 tablespoons (1 stick/113g) unsalted butter, preferably European-style, cut into 1-inch cubes
1½ cups (204g) unbleached all-purpose flour
1 tablespoon plus 1 teaspoon granulated sugar
½ tablespoon kosher salt
Flour, for rolling out
Pour ½ cup of water into a measuring cup filled with ice cubes. Set aside.
Place the cubes of butter on a parchment-lined baking sheet and place it in the freezer for about 15 minutes to quickly chill.
In a large bowl, whisk together the flour, sugar, and salt. Add the chilled butter to the flour mixture and, using a pastry cutter, fork, food processor, or stand mixer, cut the butter into the flour until there are no visible bits of butter that are larger than a pea (about ½-inch pieces). This will allow the crust to be marbled with butter so it melts in the oven while it bakes, and the steam from the butter will separate the crust into multiple layers—resulting in a flaky crust.
Pour ¼ cup of the ice water into the flour and butter mixture. Using your hands, gently work the water into the flour mixture until the dough comes together. If the dough is still very crumbly and dry, add ice water 1 tablespoon at a time until the dough comes together.
Lightly flour your work surface and set the dough on top. Gently knead the dough into a ball. Do not overwork the dough or else you may activate the gluten. Having too much water or overworking the dough may mean that your pie dough will contract while you roll it out and will not hold its shape.
Use your hands to press the dough into a disk 1½ inches thick. Wrap the dough well in plastic wrap and refrigerate for at least 1 hour and up to 3 days. (If refrigerating for more than 1 hour, let the dough sit on the countertop for 20 to 30 minutes before rolling; you can also freeze the dough for up to 6 months; if freezing, thaw in the refrigerator overnight before using.)
While the dough chills, fill a large bowl or a large baking dish with ice cubes. Place the bowl or baking dish on the countertop to chill your work area. (This is especially helpful to do on a hot day; chilling the countertop helps prevent the butter in your pie dough from melting while you roll it out.)
Remove the chilled dough from the refrigerator and discard the plastic wrap. Pat the countertop dry if you used ice cubes to chill it and lightly flour the surface. Set your dough on the countertop, then lightly flour the top of your dough.
When rolling the pie dough, start rolling from the center of the dough and roll away from your body. Slightly turn the dough with each roll, forming a round shape as you go. Turning the dough as you roll also ensures that your dough does not stick to your countertop. If any part of the dough tears along the outer edges while you are rolling it out, simply mend it back together using your fingertips.
Once the dough has been rolled out to the diameter called for in the recipe, pick up the dough by rolling it over the rolling pin, and transfer it to your pie pan or baking dish, unrolling the dough and draping it over the baking vessel. Follow the recipe instructions for fitting the dough into the pie pan and crimping.
Justice of the Pies is available now wherever books are sold.


